Monday, August 30, 2010

homework

Ana Guan

casual jacket - denim, puffy, parker.
Also an accessory.
Go to, son!

Drawing jacket in class


Has to be step by step
Base step and then add to it so - collar and actual shape of jacket.
Sleeves sit behind, but everything else is floating on top.
Don't forget jacket shadows - these little details are important.
Make a shadow shape and put it into the symbol library.
Notice - cuff uses clipping mask. Doesn't matter what stripe is in it, but can just do it in illustrator.
Good for DDS - has contrast of rolled up sleeved and long sleeve. Show each of these views.
2 separate front views.

New - zooms!!!!
Doesn't have to be hand drawn any more to show little details.
Just copy and paste whole garment, do a circle and make a clipping mask, then enlarge and now you have a zoom.

Have to make an illustrator striped shirt!!!!!!!
This is the last week of drawing and homework.
Have everything finished by next week.

Saturday, August 28, 2010

Up yours photoshop.

I definitely didn't want to save my work anyway.
WHAT DOES THIS MEAN?

Thursday, August 26, 2010

Monday, August 23, 2010

homework

re-do the stupid t-shirt.
need to do a shirt using the clipping mask to create the stripes.
plasket, tucks on sleeve - grey shadow to indicate which way it goes.
don't forget - tab and tucks.
do shapes of shirt then copy and paste, so that the DDS stays nice and clean.
Use divide tool to make sure we can do each of the stripes that go in different directions.
Buttons - draw circles and use align (next to pathfinder) to get each of these in line.
Use align and distribute to make these even.

HOMEWORK
striped business shirt.
polo shirt collar - collar only!
put print on shirt.

symbol library needs
- ribbed collar
- polo collar
- buttons

to change zipper colour - duplicate zipper brush - grab and pull into illustrator.
then you can alter the artwork, including colour

T-shirt

Make sure that the t-shirt is one shape, rather than two pushed together - propellor J.
Take the fill off.
Use pathfinder, divide button.
This groups the shapes.

To make something shorter, select with white arrow - only the points you want to move - then use the arrow keys to move them around.

Masks
collar shape has to be at the front, after you have drawn the ribbed brush over this you have to move the brush to the back. Similar to divide, select both.
Clipping mask - object, down the bottom is clipping mask
Right click, make clipping mask. This covers up all the area outside of this shape. Can use white arrow to change this.
Now we cut clipping mask out and put it back in the group
Select, apple x, go back into group and control v. Move it so it fits on top.

We can always go back into group or back into mask.
Make a back collar.
Bear in mind that once we have made a collar once we never have to do it again. Put it into our lovely symbol library and never ever draw it again.

One thing missing on t-shirt - back of shirt - just make any old shape and send to the back.

Saturday, August 21, 2010

Dress DDS


Ask Lea why I can't fill in the inner back bit.

Friday, August 20, 2010

My secret and your secret under people's feet.


All photos By Henri Laritgue - these are just over the top beautiful.

Monday, August 16, 2010

It's always better on holidays, so much better on holidays, that's why we only work when we need the money.


Photos courtesy of Chris Andrews

Zipper Pull

Rounded rectangle tool - keep repeating shapes on top. Group.
Make a hole at bottom - cut this shape out of the others - select outside 2 shapes - go to pathfinder, use divide button, click.
This cuts shapes out and then groups them.
If we delete the shape in the middle then it makes the hole.
Use gradient tool to get a metal look - awesome!!!!

Homework

Also create a zipper tag and put it into the symbol library.
Homework - practice drawing dress and skirt of your choice - has to have pleats or ruffles. Movement. Remember that you are building shapes - try to colour it in.
Draw dress from Lea
Frill - UTS online - jpeg called frill.
Easy - draw by hand or scan!!!
Trace around the one on UTS online - Add stitch line, save as a brush.
Make this pretty.
ALSO - silhouette of T-shirt. No detail.

Symbol library


Crotch issues - join with pen tool, delete an anchor point and they will join to a point.
Homework for this week - ruffled dress, Lea will send us the picture.
Have to draw overlocking.

First - how to save drawstring to symbol library
Open symbols library - underneath swatches.
Use this to put in frequently used things - eg, our drawstring
Every palate has menu at top right - this is important. Go down to "open symbol library" and "save symbol library" - can download symbol libraries in the same way as brushes.
To use symbols grab and drag into library.
Right click on symbol, select break link to avid the colours changing on everything.

Get rid of everything from symbol library and we start our own.
Go to pants layer, select drawstring, then click on top right thing ---> new symbol --> name it, "drawstring" --> not movie clip, graphic.
Now we have our new symbol!!!!

Each DDS we create uses the same symbol as long as we keep using the same file - if we want to have our symbol library everywhere, then this is how we do it

Menu, down the bottom, choose save symbol library, save this to your USB under symbol library - saves as a separate illustrator file.
Each time that you create a new symbol save it to your library - this can then be on any computer!!! This is easy and saves lots and lots of time.

--> Brushes
Now - new layer - call this brushes.
We'll start making some brushes - we need a grid to start with. View --> show grid.
Zoom in on a few - this is a boundary. We are going to make the overlocking stitch!!!!
2 ways - physically draw with pen tool - 1 straight line, weight 3, then do an S next to it.
OR - use type tool. Type must be thin, Arial narrow? Manipulate to be skinny to look like the other one - has to overlap the black line. Make sure this is not a text box, just click once on the box.
Problem - we cannot create a brush using text - select s, then to Type, then to "Create outline" - has outlines, looks like something we drew with pen tool. Now we are ready.
Group line and S together.
Copied and pasted with mouse and alt and shift. Click FIRST, then alt and shift and drag away and you will have a copy! Hand has to hold all - mouse alt and shift.
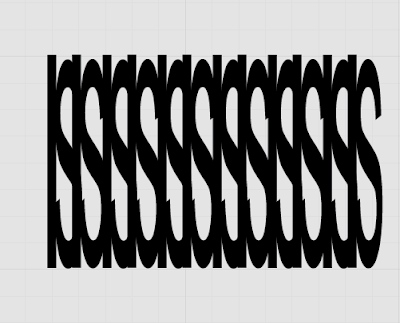
Put S over the other one - Apple D will duplicate your last move. Keep duplicating until you have a row.
Like so.

This is using the text version
The one we draw ourselves is a bit thinner, less clunky - maybe try this at home.
How do we get this to be a brush?
Open brushes in window - these work in the same way as symbols. Similar to photoshop.
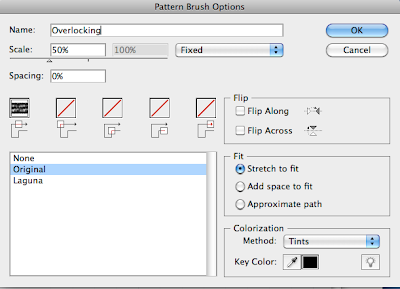
Select row of stitching - same way as symbols - top right menu - new brush - choose pattern brush. Next window - can change scale - 50%? Trial and error. Name brush - overlocking. Don't want to flip, direct repeat. Stretch to fit.
Worry about colour!!! Choose tints, otherwise you can't change colour of stitch.

Now, just select brush and choose our stitch - change thickness etc.

Now, zippers!!
2 types - basic with lines, or teeth. Must have both.
Create simple zipper first.
Rectangle tool, make black rectangle.
Practice copy and paste woot. Use the same technique, alt shift then duplicate.
Lots of black rectangles. Create this into a brush, the same way as before.
To alter brush - double click, if the spacing is wrong, just change. Go back into the brush, apply to strokes.
To make it look like it's open, reflect and copy and have them moving away from each other.
This zip also looks a bit like ribbing, make the same brush but thinner.

Now - detailed zipper. All done in how you actually draw it. Can be done by hand, but we are going to practice manipulation.
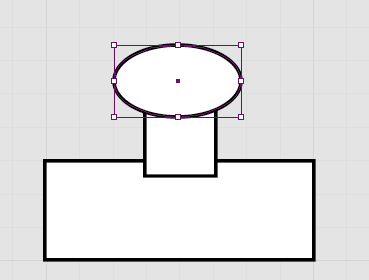
Create 2 rectangles and a circle - new palatte, the "pathfinder" - can trim, merge, crop, make to outlines - practice merging these to one.

Select all the shapes - merge.
Use white arrow and try to manipulate to zipper tooth. Delete points using white arrow and then use pen tool to make the curve.
Remember with the white arrow, if you want to change an anchor point that all of the points have to appear white, not black. If the point is black the whole thing moves.

Make sure zipper is a tiny bit wider than the graph -->making brush. The same old.
This can go on the side of a jacket front.
Object -->tranform --> reflect - problem, zipper teeth are going the same way. Ugh.
So - we need to make a brush that goes the opposite way.
Reflect our original, turn it upside down (in transform, rotate), make it a new brush.

Need to make a zipper that is closed, as not all zippers are open.
We'll use the one tooth we've already drawn. Make sure it's absolutely symmetrical.
We need a piece that will join this exactly.
Draw 2 lines on the top.
Fill this in - make a square and fill and sent it to the back. Define as brush etc.
Gaps - this is because my white doesn't come to the edge - have to make it bigger.
Save brush library. Same way as with symbols.

DDS on illustrator.


Monday, August 9, 2010

DDS


New layers - pants and shorts, one with rulers and guides - view --> ruler -->view rulers. Put in new guides at waist, bust CF and CB.
Always start at CF - we are only drawing half of the short.
Use pen tool - a few pointers - when the green line is showing, that means that you are in line with the previous point. This means you can make the lines perfectly straight!
Don't put the CF point straight on the CF line - a little to the side.
Remember - DDS is just a series of shapes, overlapping. We create the main silhouette first, the half of the DDS needs to be copied and flipped.
Object -->transform -->reflect - default is exactly what we need! Press copy (not ok) and drag it to where we want it.
To join crotch area - use shift to select both of these points at the crotch - right click and choose join.
Make sure every layer other than the shorts and pants layer is locked.
To fill - unselect the little red line across the fill button, make sure that the area is selected and choose a colour - I went with white.


Ewww.
Next - waistband. We need to draw another shape.
Make sure you lock the pants - object to lock to selection.
Now - pen tool to draw the waistband - just straight on the top, follow shapes.
Draw CF seam - problem, can't go through waistband. Right click on Waistband - arrange, bring to front.
Object - unlock all - then we can move the pants where we want.

To draw stitch lines - go to stroke - go to pen tool. For hem, draw one line the height you want it at. Check Dashed line box on stroke area.
And ta-da! Stitching lines. So damn easy. Can define how big we want the dash.
Make sure we do the cap thing - little button under the stroke size.


Back is just copied and pasted with front detail deleted.
Need to draw drawstring. Pen tool and so forth. Do a circle with a squiggly line over it, for the knot.
To select and move an entire segment, black arrow, select the segment.
To alter lines after this, double click into this and then change using white arrow.
To group things (layer within a layer) right click and select group.
To copy and paste - select line of stitching, alt shift and drag. Shift makes this come down directly.
Extend ends using white arrow.
Just attach this to the pants.

For homework - front and back done of shorts - short cut - group segments of the lines and group them, then copy and paste.
Also - pair of pants.
2 pt for outline, 1 pt for inside.

Assessment one

Starts today - similar to DDS folder - something done in class, something done for homework.
Combine this and create an A4 reference folder - presented in a professional way.
One A4 folder and a CD.
This has to be easy to understand! Each title written, week.
Folder in one orientation - e.g. all portrait. Make it easy for the person who is reading this.
Work done in class, physical garment taken in by Lea.
For homework - take photos of garment front and back, has to be actually showing the garment, no pixels, no blurry photos. Correspond with what you draw!
Always label front back side and specific areas that need to be pointed out, eg zoom.
Need a black and white sketch and a coloured sketch - no zoom on coloured.
Quality and accuracy is the aim, proportion etc.

Digital DDS library disc - has digital sketch library
- digital sketch reference library
- Brush library
- Symbol library
- Swatch library
- 1 combined PDF file of all of your DDS folder.
These need to be filed nicely.

Week 2 - 2 DDS drawings - the shorts and a pair of pants of your own choice.
These don't have to be printed at a printer, just at home is fine.
Remember - you can always fix up your earlier drawings later in the term.

Last week - to close the pen tool, click on black arrow and click outside - simple.

Monday, August 2, 2010

Outline

Remember - ask Lea about how to use the pen tool to do a segment without closing off the path - as in, an unclosed section. Is there a button to press that closes the path?

Illustrator vs photoshop

Illustrator is vector - does not use pixels. Pretty difficult to make Illustrator pixellated.
Vector - not made of lots of little dots as in photoshop. Vector is more mathematical - all just lines - can be very small or very big. Flat, clean print.
Don't do text in photoshop, artwork in photoshop then moved to illustrator.
Illustrator is set up to be the same set up as photoshop.
Add colours to layers to make sorting easier - double click on layer and set colour. New layer? Click on top right bit and hold down.
For squares, use rectangle tool, hold down shift to keep in proportion.
Zoom out as much as you want - all this is useable - you simply select the area you want to use.
Use black arrow tool to transform - don't have to do edit/transform.
Little white and black squares - the black background one does an outline - you can change the colour. If you want to get rid of the outline just hit the button with the red stroke.
Eye turns layers off and on - can lock layer now as it is finished.
Create new layer - template.
3 ways to get template into file - for now open with illustrator - it's now a new document, can be moved around with the lovely little black arrow.
Don't have to worry about which layer you are on to select - will always grab the one you are aiming for. Hooray!
apple C and apple v to put into the DDS library.
Put template layer under grey layer.
Go back to background layer, unlock, down opacity until you can just see template. Lock template and coloured background layer. Turn little eye off on template.
Add new layer, label class work.
Go to pen tool. Click down - options! When you are about to start, there is an x - meaning it is ready to go. Start to notice symbols that go with pen tool.
Open window called stroke - 2 pt is standard outline stroke. Details smaller. Change weight.
The colour you selected for the layer is the colour your dot will be. Make a line. Add a curve in in the usual photoshop manner. Fill colours will appear between your dots - that's why the background is grey, to remind us that the lines have a colour and have to be joined properly to fill in neatly. Fills automatically. Illustrator does not need alt key to delete. Hover pen tool over anchor - use this to deselect bottom handle bar. Simply click on anchor point and handle bar disappears!!!! There is now no direction.
Hover over point you started at - this shows a circle symbol - this is asking you if you are finished. Click on this and the shape will be closed. From here there will be the little x to show that the pen tool is ready again.
If you want to leave a shape - little black arrow, click out.
To go back in - get pen tool, hover over where you left there will be a slash (/) symbol, asking if you are wanting to restart there.
To move handlebars - use black arrow, white arrow. Play with this to get your shapes.
If you only want to alter one curve - press alt - you are only using the one handlebar, thus altering one curve.
Hover pen tool over part of line - plus symbol - add something?
If for some reason it isn't giving you the plus sign, clicking on pen tool gives you all those options. This selects a tool that just does that.
White arrow selects last part of line, select and press delete.
HOMEWORK - red as outline colour, click on template, trace template with pen tool. Turn fill colour OFF, jus want red outline. At the end we can fill, but for now it's better to leave it off. There is no history, just use apple z.

First day back

Digital DDS - same rules as illustration DDS apply, send to pattern maker, has to be accurate.
Include description, closures, seams, top stitching - basically to show how everything works.
Divide long centre lines - start at waist band - use template... etc.
The only difference being that these DDS drawings can be coloured in, can put prints on.
These are exact copies, fabric etc.
Ways to use DDS - how it is used in the industry.
Presentation sheets - basic design, digital DDS and hand drawn. Digital used to show colour, patterns and proportions.
Range board and range sheets - gives an idea how the entire range fits together. Can be used in presentations to the client. Technical information.
Look book - books for designers selling to buyers - fashion picture with basic DDS next to it.
Spec sheet - plain, black and white, technical. Very detailed, accurate, non stylised. Sent to factory to give specifications. DDS then lots of information - instructions for the maker. Sizes, buttons etc. Used by everyone in the company - production, designer, pattern maker, digital designer, reference. So it has to be accurate.
Costing sheet - goes with spec sheet - everything must be here, thread, cost of fabric, cost of fusing - everything. Everything that goes under garment. How long it takes to make, all costs together - triple cost. Generally has an image on it just to make everything clear. Cost sheets are very private.
Trend prediction books - more stylised DDS, put in presentations. Basic indication of silhouette, style, feel of the season's garments. Sometimes used on websites.
Merchandising plans - gives an idea of how the shop will look.
Commercial patterns - also used on pattern instructions.