
Artboards have changed a little since the last time we've used them.
Illustrator - for vector. Means that we don't get pixels, but the computer uses an equation that allows the text to scale to any size, remaining sharp. Photoshop - bitmap - for photos. Uses pixels, hard to blow up. PDF is standard for printing.
To compress files - right click and compress - turns it into a zip file. God to send to yourself. Sign up to yousendit.com - sends a file to anyone for free. Or wetransfer.com Can send things to printers - send up to 2GB.
Delete files that you don't need, they just get confusing. Don't hand in practice drafts. Use layers in illustrator, make sure you lock and make invisible. Name so that you can locate quickly.
File setup in illustrator - Name everything 2011_kruszelnickia_task1_week1
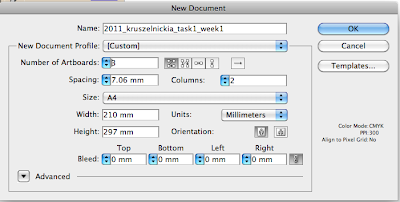
Make sure that you are doing print documents, can do heaps of artboards - set up bleed, allowance to make sure that it prints in the right spots. Remember spacing stuff - to keep each artboard a little part away from each other - 1.5 cm. 3mm bleed is industry standard - click on paper clip thing to make them the same.
Save things into Student work - can be saved and pulled out later. Remember to save it as a legacy format. Saving into student work - can only be accessed in this computer. Also, anyone can delete. Can also save to public areas.
Preferences - under illustrator dropdown, general

Getting the proper types of black - rich black - black as well as cyan, magenta etc. True black is just black. Can check "display blacks accurately". This can be very obvious in printing, so check those in settings in general, and then you will have it all in place.
 Remember to keep in CMYK
Type - everything for fonts etc
Most of the stuff in the drop down edit and file, are also in the right click. For mice without buttons, just hit control before you bring it up.
Effects - at the top is illustrator effects, at the bottom is photoshop.
View - show grid, rulers etc
Window - all tools and libraries.
Help menu - very useful
Artboard tool - click on sideboard tool, or go into document setup. If you want to move documents further away, just click on the artboard, and you can just shift them around with the mouse. Selected when it has dashed lines around the outside. Add another in just by clicking and dragging.
Shortcut to hand is putting down space bar key. Zoom in, and when you hold down the option key, you zoom out
Can save workspaces -
 this keeps the setup of the illustrator how we want them.
Artboards - Name each one individually - And can edit them however you want them.


No comments:
Post a Comment