This is easy. Huzzah!
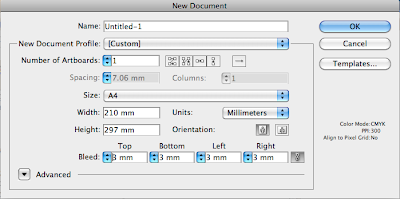
File - new - keep menu up. This is where we will make all of our changes.
Remember that you can always change this afterwards. You don't have to worry about expanding or whatever.
How to print without the white border - Have to figure out the size of our print. The only way that we can do it without this is to cut it off. When you've set up the file correctly you put in marks to show yourself where to cut.
To do this - we make our images bigger than they have to be - as in, if we want A4, we print A3.
Oversize A3, and cut to A3.
Make the artwork go a little over the size. Add a bleed.
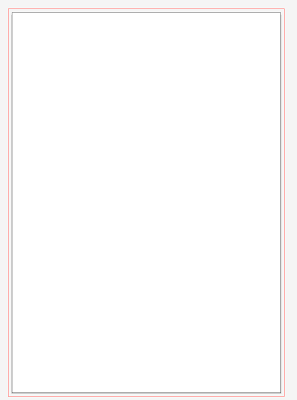
Bleed - 3mm to 5 mm - artwork has to extend to the edge of bleed.
Cut line is next. And we also have a safety line where all text has to stay - otherwise we run the risk of cutting off letters of important things.
To add this information in is easy. Every printer and illustrator knows about bleed.
We can add this in when we make the file.
Make sure we do this at the beginning. It just saves time.
Printable area is within black, but we make the image as big as the red outline
Bring a ruler to class from now on.
This size is A4 - I want to make this landscape - use artboards - this shows us the centre point. View --> show rulers - drag and line up with centre.
Landscape tool is at the top.
Add an extra 5mm to the centre so it can fold over - length will be 15.5 x 12 as finished flat shape.
At the top right in artboard I can type in my size.
Now we think about fold - front has to be a little bit bigger than the back.
6.1 for the front.
To change 0 - drag from top right corner to where you want it to be.
Make marks of where we want this to go - use pen tool on black outline in bleed section - this way it won't be visible once we've cut the bleed section off. Make sure the mark is on both sides.
Remember to put the artwork to the back, otherwise we won't be able to see our lovely and important marks.
Don't get rid of fold line, but you will have the lovely marks when you print. This makes it easy for yourself.
This helps us to remind ourselves of where the front and the back are.
This can be used over and over again. Save it as a feeler template.
Top is the front, bottom half is the back. Don't forget that the writing has to be the upside down for the front!!!!!!
Now we are close to finishing the file.
One thing left to add in - the safety line. This is purely done with guides, just as a reminder to yourself. Make safety inside the black line at 5 mms.
Now we know that this is where the artwork goes.
And we are safe!!!!
Print feelers one to an A4 page.
When you go to do the files, set them up the same way.
Save out each layer with the background as a PDF, as we did with the earlier projects.
We can add in crop marks after this - it only adds crop marks to the corner of the artboard.
When we are saving, make sure you choose the amount of bleed - eg 3 mm.
Check - crop mark, colour samples, registration marks etc.
Fold before you cut!


